3D Christmas Truck Laser Engrave File: A Practical Guide for Creative Projects
As the holiday season approaches, many creators and small business owners look for unique ways to add festive flair to their products. One standout option is the 3D Christmas Truck Laser Engrave File, a versatile digital asset designed specifically for laser cutting and engraving. These files allow you to bring a charming, three-dimensional Christmas truck design into various materials like wood, acrylic, or leather with precision and ease. Whether you're making home decor, stationery, textiles, or custom gifts, these files can streamline your workflow and enhance your output.
What Is a 3D Christmas Truck Laser Engrave File?
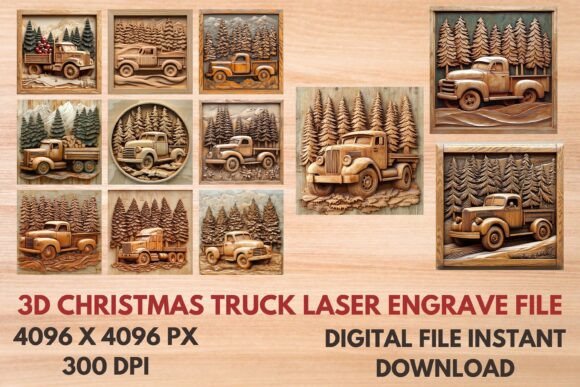
A 3D Christmas Truck Laser Engrave File is a high-resolution digital template that includes detailed vector graphics and PNG images of a festive Christmas-themed truck in three dimensions. These files are optimized for use with laser cutters and engravers, enabling accurate reproduction on a wide range of surfaces. The set typically contains multiple formats such as SVG and PNG at 4096x4096 pixels and 300dpi resolution, ensuring clarity and compatibility across different tools and software platforms.
The key features include:
- 12 coloring PNG files – ideal for visual previews or layered engraving effects
- 12 black and white PNG files – perfect for clean engravings or monochrome designs
- SVG versions – scalable for precise cutting and engraving without losing quality
- Transparent background – allows seamless integration onto any material
These files are not editable in terms of vector manipulation but offer flexibility in resizing to fit your project requirements. What makes them particularly valuable is their ability to be used directly in laser engraving machines after minimal setup.
Where Does This Fit Into Your Workflow?
Laser engraving projects often involve several stages, from idea generation to final production. Here's how the 3D Christmas Truck Laser Engrave File can integrate smoothly into each phase:
Preparation Phase
Before starting any engraving or cutting project, it’s essential to choose the right design that aligns with your product and brand aesthetic. The 3D Christmas Truck Laser Engrave File serves as a ready-to-use solution during this planning stage. You can review the PNGs to visualize how the design will appear on your chosen material. Since they come in both color and black-and-white options, you can decide whether to incorporate depth through multiple layers or keep it simple with a single-engraved layer.
It's also important to consider compatibility. Make sure your laser machine supports SVG file formats for cutting and PNGs for engraving. If needed, convert or import the files using compatible software like Adobe Illustrator, Inkscape, or CorelDRAW. This step ensures that your design translates accurately from screen to material.
Execution Phase
Once you've selected the appropriate design and confirmed its compatibility, the next step is to prepare your laser machine. Import the SVG file into your engraving software and adjust the size according to the product you're working on. For example, if you’re engraving a wooden ornament, scale the design down to fit within a 5x7 inch frame while maintaining the intricate details.
If you're using the PNG files for engraving, ensure the settings are configured for image-based engraving rather than vector cutting. This might involve adjusting the power and speed settings depending on the material thickness and type. Testing on a scrap piece before applying the design to the final product is always a good practice for quality control.
Post-Production Integration
After engraving, the design can be incorporated into a variety of items. For instance, you might apply it to wooden coasters, greeting cards, or even fabric patches for clothing. The versatility of the 3D Christmas Truck Laser Engrave File means you don’t need to start from scratch every time — simply resize and reapply as needed for different products.
For those creating seasonal collections, having pre-designed elements like this truck can significantly reduce the time spent on ideation and increase consistency across product lines. It’s especially useful for businesses looking to maintain a cohesive theme while scaling up production.
Use Cases Across Industries
The applications for a 3D Christmas Truck Laser Engrave File extend beyond just holiday decorations. Let’s explore some practical use cases across different sectors:
Home Decor and Woodworking
Woodworkers and DIY enthusiasts can use these designs to create personalized wooden signs, wall art, or candle holders. The high-resolution PNGs allow for detailed engraving, capturing the festive spirit of the truck’s 3D structure. Pairing it with other holiday motifs like snowflakes or reindeer can lead to a visually appealing and thematic display.
Stationery and Paper Crafts
In the realm of stationery, the design can be applied to notebooks, planners, or gift tags. Using the black-and-white version for engraving adds a subtle yet elegant touch. Educators and bloggers might find these useful for creating branded journals or calendars that stand out in a market flooded with generic options.
Textile and Apparel Design
Though primarily used for hard materials, laser engraving can also work with textiles when using the right tools and techniques. The truck design could be adapted into fabric patches for jackets, hats, or bags. Marketers and entrepreneurs selling seasonal apparel can leverage these files to produce limited-edition merchandise quickly and efficiently.
Tableware and Packaging
Custom tableware, such as wooden mugs or cheese boards, becomes more attractive with engraved holiday themes. Similarly, packaging for handmade goods or retail products can feature the 3D Christmas Truck design to catch attention and convey a sense of warmth and tradition. Retailers can print these designs on boxes or tags for a professional finish that customers love.
Workflow Tips for Maximum Efficiency
To get the most out of the 3D Christmas Truck Laser Engrave File, here are a few practical tips:
- Organize Your Files: Keep all your design assets in a dedicated folder, labeled clearly by format and purpose (e.g., "PNG - Color" or "SVG - Cutting"). This helps streamline the process and avoid confusion later.
- Test on Sample Materials: Before engraving the final product, run a test on a similar material to check for accuracy and detail retention. Adjust laser settings as necessary to prevent burning or under-cutting.
- Batch Processing: If you're producing multiple items with the same design, batch processing can save time. Set up your machine once and repeat the engraving process for consistency and efficiency.
- Resizing Without Distortion: When resizing the design, always maintain the aspect ratio to avoid stretching or distorting the truck’s shape. Use your design software’s "scale proportionally" function for best results.
- Combine with Other Assets: Don’t hesitate to mix the truck design with additional elements like text, borders, or other holiday icons. Layering can help you achieve a more dynamic and professional look.
Factors to Consider for Long-Term Use
While the 3D Christmas Truck Laser Engrave File is an excellent resource, there are a few considerations to ensure long-term usability and quality:
- Material Compatibility: Confirm which materials work best with your laser cutter. Some woods may require lower power settings, while acrylics might need higher heat for a clear cut.
- Storage and Organization: Store the original files in a secure digital archive. Proper organization prevents duplication and wasted effort when revisiting past projects.
- Quality Control: Periodically review your output for consistency. Over time, laser machine calibration may shift slightly, so testing your designs intermittently ensures they remain sharp and clean.
- Seasonal Relevance: While these files are perfect for December, consider how they might adapt for future holidays or events. Saving variations or tweaking the design could give it renewed life in subsequent seasons.
Integrating into Broader Creative Processes
Many creators operate within tight timelines and budgets, especially during peak seasons. The 3D Christmas Truck Laser Engrave File acts as a foundational element that can be reused across different products. For example, a small shop owner might use it for wooden ornaments, then modify the size and placement for printed tote bags or embroidered caps.
Additionally, these files can be part of a larger design strategy. They might serve as a central motif in a collection, complemented by other laser-ready designs such as poinsettias, snowmen, or gift boxes. By building a library of such assets, you can rapidly assemble new products without compromising on creativity or quality.
Practical Implementation Example
Let’s walk through a real-world implementation. Suppose you're a hobbyist who wants to make custom wooden mugs for a local holiday market. Here’s how you could proceed:
- Download the 3D Christmas Truck Laser Engrave File and extract the contents from the zip folder.
- Open the SVG file in your laser software and adjust the size to fit the mug handle or base area.
- Print a preview of the PNG file onto paper to see how it looks before engraving.
- Set up your laser machine with the correct power and speed settings for wood engraving.
- Run a test on a sample piece to confirm the engraving depth and clarity.
- Apply the design to your finished mugs and sand or polish the surface as needed for a smooth finish.
This approach saves time and effort while allowing for customization based on feedback from your test samples.
Conclusion
The 3D Christmas Truck Laser Engrave File is more than just a festive graphic — it's a functional tool that supports creative expression and operational efficiency. Whether you're a seasoned craftsman or a beginner exploring laser engraving, these files offer a reliable way to add holiday charm to your products. With thoughtful preparation and integration, you can leverage this design across multiple industries and workflows, making it a valuable addition to your digital toolkit.